It is actually quite simple to have proofs made. But experience shows that many customers often stumble over the same mistakes. We have put together the ten most important steps towards a successful proofing job:
- Proof as late as possible in the production process
- Select the right proof profile for your purposes
- Convert RGB or LAB images to CMYK
- Name Pantone and HKS colours correctly
- Proof your data in a 1:1 ratio and not scaled down
- Always proof with UGRA/Fogra Media Wedge 3.0
- Make sure that the job ticket is correct
- Make sure your service provider has the latest proof software and hardware
- Only accept authentic “contract proofs” according to ISO 12647-7
- Make sure that your proof provider has valid certifications
In the following we would like to present these individual points in more detail.
1. Proof as late as possible in the production process
The optimal solution is obvious: send the same data to the proof as you send to the print shop. This way you can make sure that the proof really matches the print. I remember a case where a complaint was made about an ad we proofed that contained a picture of a deserted corridor in a building: “The proof looks very different in colour from the print”. After a long search for errors in colour spaces and image formats, we noticed: The perspective of the proofed corridor was slightly different from the actually printed corridor. Why? At the last minute, the agency had swapped the original – and proofed – image for a slightly differently photographed image of the same aisle. It is immediately clear that the colour cannot be right here.
Therefore, if possible, proof the same data that you send to print or make sure that images and PDF export settings are identical for proof and print.
2. Select the right proof profile for your purposes
A proof is only colour-binding if it was created with the matching proof profile. If you want to proof a writing paper, you cannot proof according to ISOCoatedV2. ISOCoatedV2 is an image printing paper proof standard, whereas a letterhead is always printed on uncoated paper. Instead, you should select PSOUncoated as your proof standard. An ISOCoatedV2 proof will be much more colourful than could ever be printed on plain paper. And also for newspaper printing ISOCoatedV2 is not suitable, here you need an ISONewspaper 26v4 or similar.
An overview of all current proof profiles can be found here.
If the final print and therefore the proof profile is not yet fixed or no print profile is known (e.g. for roll-ups etc.) you can proof in ISOCoatedV2.
3. Convert RGB or LAB images to CMYK
The majority of all proofs are created from PDF files in X1-a or X3. Agencies and graphic designers either create their data in CMYK or convert colour spaces such as RGB or LAB to CMYK during PDF export. This has its justification:
Modern RIP software in printing companies or at the proofing provider can easily convert RGB or LAB colours into the CMYK proof colour space during proofing. However, it is possible that the printing company uses other RGB profiles (e.g. ECI-RGB instead of AdobeRGB 1998) or other rendering intents (e.g. “absolutely colorimetric” instead of “perceptive”) for the colour conversion from RGB/LAB to CMYK like the agency or proof manufacturer, which of course leads to a different colour result. You are therefore always on the safe side when you deliver all data in CMYK for proofing. Of course, spot colours are excluded from this, they should be created as additional colour separations.
4. Name Pantone and HKS colours correctly
For you, colour designations such as “the green from the last print job” or “customer red” may be unique colour designations. But the Proof-RIP cannot interpret such colour names correctly. You should therefore name colours explicitly in “HKS 41 K” and “PANTONE 217 C”. You can easily do this by selecting the colours in the Adobe programs from the provided Pantone and HKS libraries. Also important: For the printer an HKS 41 is an HKS 41, for the RIP an “HKS 41 K” is a completely different colour than an “HKS 41 N”, a “PANTONE 217 C” is a different colour than a “PANTONE 217 U”. So choose the right colour depending on the uncoated paper or picture print. A professional Proof RIP does not know a “HKS 41” or a “PANTONE 217”.
5. Proof your data in a 1:1 ratio and not scaled down
A proof is only meaningful if it is created in the same size as the subsequent print. Why? When data is calculated in detail, on the one hand details are swallowed and on the other hand parts of the image may be calculated differently. While a shirt with a checkered pattern of red and white in the DIN A3 original still offers some well distinguishable colours, its pedant scaled to DIN A6 might be only flat pink, as through the scaling, the check is converted to a surface. In this case, the proof is useless both for the evaluation in advance and for the printing. Therefore, it is better to proof a section 1:1 to the later final format than to break down the whole motif.
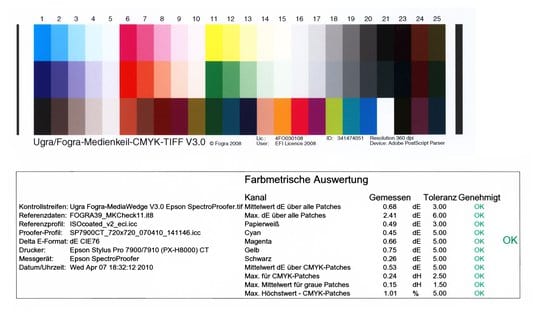
6. Always proof with UGRA/Fogra Media Wedge 3.0
A proof is only colour and legally binding if it contains a media wedge. Although the old media wedge in version 2.2 is still standard with some service providers, the media wedge has been published in version 3.0 for 8 years. So anyone who still proofs the 2 media wedge has probably not updated their proof software since 2008. Avoid these service providers. If you also have the media wedge provided with a test report, you and the printer can see at first glance that the proofed data is within the tolerances of the ISO standard.
Here is a current UGRA/Fogra Media Wedge CMYK V3.0 with test report:
7. Make sure that the job ticket is correct
According to ISO 12647-7, each proof must contain a job ticket with at least these requirements in a ” simple and understandable ” way:
- Name of the printing system (printer, software)
- Designation of the colourants (inks)
- Name of the substrate used
- Identification of the printing condition to be simulated
- Date and time of proof creation
- Date and time of the last calibration
- The used colour profiles, at least the used simulation profile and the rendering intent for the simulation
No less, but also not necessarily more must be printed on the proof.
8. Make sure your service provider has the latest proof software and hardware
Unfortunately we know service providers who have not calibrated their proof systems for more than 10 years. The proof software there is also still as of 2003, so it is obvious that proofs according to ISO 12647-7 can no longer be produced here. Although such companies sell proofs, they simply produce coloured paper. So make sure that your proof service provider uses the latest software and hardware. Especially when simulating HKS and Pantone colours, every new hardware and new software provides visible improvements. And even modern PDF formats like PDF X-4 cannot be processed correctly on old RIPs.
9. Only accept authentic “contract proofs” according to ISO 12647-7
The ISO standard is unmistakable:
ISO 12647-7 = “Contract Proof”
ISO 12648-8 = “Validation Print”
Nevertheless, the imagination of some service providers knows no bounds: ISO Raster Proofs, Swabian Proofs … they usually conceal a “Validation Print” according to ISO 12647-8, which at first sight only sounds like an eight instead of a seven behind ISO 12647, but: These so-called “Proofs” are actually only “Prints” and NOT colour- and legally binding, as higher tolerances apply for -8 than for -7! So before you order the very cheap ” wannabe proofs” of some service providers you should consider ordering a truly colour and legally binding “contract proof” according to ISO 12647-7 for a little more money. “Contract” stands for a contract between proof and printer. Fogra and ISO have done well to call only one product “proof” and the other just “print”. So please do not allow a “print” to be sold as a ” proof”. One is colour and legally binding, the other is not.
10. Make sure that your proof provider has valid certifications
Numerous proofing service providers advertise with Fogra logos on their websites. In fact, Fogra does certify proofing companies that have to undergo a detailed examination of their proofs. Fogra certifications go far beyond the mere testing of a media wedge and contain many other test criteria that must be fulfilled for certification. Fogra certifications expire after one year. The proof quality must then be reconfirmed by Fogra in the course of re-certification.
Many service providers shy away from having their quality checked again by Fogra, but still advertise years later with their certifications, some of which expired in 2008. You should only accept Fogra certificates that have been issued for “Contract Proof Creation” and bear a five-digit number. You can research this number at Fogra: https://fogra.org/en/certification/certified-persons-companies-and-products/contract-proof-creation-cpc
Once a result is output after entering the report number, the proof service provider has a currently valid certification that can be viewed. If no result is output, the service provider only advertises this, but does not have a valid Fogra certification. Unfortunately, this currently applies to numerous proof service providers, as Fogra does not check their certificates sufficiently.
Here you can see our valid Fogra certification for proof production according to Fogra 39 (2020)
You can see a valid Fogra certificate here (2013)
You can see a detailed Fogra test report on the certification here (2013)
More articles related to this topic:
Precise proofing of tonal values of spot colours

In recent weeks, there have been lengthy discussions on the Fogra digital printing mailing list as to whether a research project should be launched to define standardised tonal value gradations for spot colours. What is this all about? In the field of CMYK and seven-colour printing, the definition of clear, printable and proofable standards is well established and has been tried and tested in practice. If the paper or paper class is known and defined, a measuring standard such as M0/M1/M2 has been established and the content of optical brighteners … read more
New iPhone colour measuring devices: xade nano+ in test

A new generation of colour measuring devices is entering the market: in contrast to the classic measuring devices, which are available as a fully encapsulated system either as a colourimeter or as a spectrophotometer, and then supply the data to a computer via an interface or app or display it directly, the new generation of colour measuring devices consist only of lighting and software, with the optics of a modern iPhone from Apple being used as the sensor. Until now, there have been two categories of measuring devices on the … read more
New edition of ISOCoatedV2 in M1 in sight?

Even almost 9 years after the introduction of the successor colour space PSOCoatedV3, ISOCoatedV2 / FOGRA39 is still the most widespread colour space in Europe. We at Proof GmbH count around 200 jobs from time to time for the German Printing and Media Industries Federation, among others. In the last count, proofs in ISOCoatedV2 accounted for around 68% of all proof jobs at our company. This is a clear sign of the continued widespread use of the colour space. ISOCoatedV2: From the classic colour space to the beacon of the … read more
Colour deviations in 2023 PANTONE Color Bridge Guides

After Eddy Hagen pointed out in this posts, that there were some major colour deviations between the brand new PANTONE Solid Coated Guide 2023 and the previous version especially for the PANTONE 2635 C, I was curious to lookup the same colours in the new PANTONE Color Bridge Coated Guide of 2023 and compare the colours with the previous version. I measured a dE00 of 8,15 between the two colours that Eddy mentioned, which is really far apart from how accurate PANTONE colours should match between the different PANTONE guides. … read more
New PANTONE Formula Guides with incorrect ink formulations

Several errors have crept into the new PANTONE 2023 fan decks. In both the PANTONE Solid Coated and the Solid Uncoated color fans, there are colours for which the new ink formulations are incorrect. In the PANTONE Formula Guide Solid Coated fan 2023, PANTONE 107 C and PANTONE 108 C have absolutely identical ink recipes, as well as PANTONE 113 C and PANTONE 114 C. As the colors differ, this cannot be the correct. Several errors in the PANTONE Solid Uncoated fan 2023 In the PANTONE Solid Uncoated fan 2023 … read more
MYIRO-9: New Spectrophotometer from KonicaMinolta in action

Over the last few months, we at Proof.de have been thinking about further improving our already very good colour measurement technology in terms of speed and measurement precision. Relatively quickly it became clear that only two devices would come into question: The KonicaMinolta MYIRO-9, the successor of the former FD-9, or the X-Rite ISIS 2 XL. The starting point: Since we at Proof GmbH have 5 proofing devices, the calibration of targets for profile optimisation is a time-critical undertaking for us. Therefore, we had been looking around for an upgrade of … read more
Proof.de is featured twice in the “Fogra Aktuell” magazine

In the current issue of Fogra News “Fogra Aktuell” Proof GmbH is involved in two places. Firstly, a summary of the Fogra report on our first FOGRA55 certification for seven-colour printing with extended colour space in CMYKOGV appeared. You can also find more information on our FOGRA55 certification on the Fogra website: https://fogra.org/en/press-releases/fogracert-erste-cpc-zertifizierung-fuer-fogra55-cmykogv-330 and on proofing.de: And secondly, there was a report on the completion of the research project for textile digital printing, FOGRA58, in which we were allowed to investigate and test the proof capability of the new textile … read more
“Digital First” often means “Colour Problems Second!”

Whether it’s a large global corporation or a small company, the following often applies to designs or redesigns today: we develop everything for digital first.
We passed the first proof certification for the 7C proof under FOGRA55

A few days ago Proof GmbH was the first company to be certified for proofing for the new 7C exchange colour space FOGRA55. Fogra has developed characterisation data for extended multicolour printing with the printing colours CMYKOGV – i.e. cyan, magenta, yellow, black (contrast), orange, green and violet – FOGRA55 as part of a research project over the past few years. The characterisation data and the ICC profile Ref-ECG-CMYKOGV_FOGRA55_TAC300.icc have been published on the Fogra website in recent weeks. We have now carried out the certification via GMG ColorProof, as … read more
Fogra60 proofs for metal decor printing available
From now on you can order proofs for metal decor printing on white sheet metal at proof.de: The ICC profile for Fogra60 is Metal-Printing_MPC1_FOGRA60.icc
Cross-media colour management really works

Peter Jäger is an expert in colour management that reliably works across the boundaries of printers and monitors, web and print – essentially: cross-media.
Proof.de: New video online

In this short image video we – the Proof GmbH – introduce us and our work. Find out who we are and what drives us. What do you think of our short film?
Current Proof Standards 2024

Offset and Newsprint ISO Coated v2 (ECI) / ISO Coated v2 300% (ECI) Profile: ISOcoated_v2_eci.icc Standard for glossy and matte coated paper Paper: Types 1 and 2, gloss and matte coated Tone value increase curves A (CMY) and B (K) as defined in ISO 12647-2:2004 Characterisation Data: FOGRA39L ISOUncoated Profile: ISOUncoated.icc Standard for uncoated white natural paper Paper: paper grade 4, uncoated white offset, dot gain curves C (CMY) and D (K) from ISO 12647-2: 2004 Characterisation Data: FOGRA29L PSOCoatedV3 / Fogra 51 Profile: PSOcoated_v3.icc The successor of ISOCoatedV2 for glossy … read more
Proof GmbH 2021 Certified Again by Fogra with Fogra “Spot cert”

In 2021 proof.de was again Fogra certified including Fogra “Spot cert” certification, i.e. for the display of spot colours such as PANTONE C and U.
PANTONE Find a Color No Longer Available Without Registration

Shortly after Adobe’s announcement to remove PANTONE colours from their products, PANTONE removed the popular PANTONE Find a Color from their website
Adobe Software Without PANTONE Colours

The announcement was hot: As of March 2022, Adobe software products will no longer contain PANTONE colour libraries. What follows now? Who loses, who wins?
PDF 2.0 and PDF/X-6 – The New PDF Standards

The future speaks PDF 2.0: Only recently the ISO published a new revision of PDF 2.0, with which the new printing standard PDF/X-6 also takes shape.
Sphere Head Spectrophotometers and Specular Component explained

The sphere head technology and the differences between SCI / SPIN or SCE / SPEX are explained using the measurement of glossy and diffuse objects.
Proof.de parcel labels: Now paper instead of plastic

We now have more environmentally friendly parcel labels for our shipping sleeves: Instead of PVC, we use offset-printed paper labels.
Proof.de / Proof GmbH is a Member of Fogra

Proof GmbH is a member of Fogra – Forschungsinstitut für Medientechnologien e.V.. Why? In recent years, we have been able to draw on the support of Fogra with numerous projects, or work together with Fogra, for example for Fogra58 beta – Textile-RGB (where Matthias Betz was also able to report on our experiences as a speaker at the Fogra Colour Management Symposium 2020 in Munich as part of the presentation “Proofing of Fogra58beta”) or have contributed test prints and proofs to the research project “11.004L – Improving the printability … read more