Standardized light and metamerism effect

A proof is only as good as the light under which it is viewed. Just going to the window or switching on the light at dusk is useless: between December and July, between 8 am and 8 pm, between cloudy and sunny days there is a huge difference in the lighting, which makes any colour evaluation impossible. And if you switch on the light, you normally switch on a bulb with 2700 Kelvin – or even worse: an energy-saving neon bulb that somehow shines in any spectra… a disaster!

The reasons for metamerism effects (in short: that two colors look identical under one light, but completely different under another) lie in the different printing technologies. Colors that look the same under a light bulb can suddenly look very different under a neon tube.

In recent years, ink-based digital proofs have established themselves in the proofing sector. Because it is printed in ink, specially coated paper must be used, which is not in any way similar to the subsequent production run. Anyone who has ever tried to print on glossy coated paper with an inkjet printer knows: the ink never lasts! Metamerism is therefore always involved when a proof is to be compared with offset printing.

The light under which proof and production run are viewed is particularly important.

ISO 3664 regulates standardized light, which is important for viewing proofs and prints. D50 is no longer D50: The International Lighting Commission CIE has revised ISO 3664 in recent years and adapted it to today’s circumstances. If UV components used to be strictly prohibited, they are now part of the standard. In the past, the focus was on consistency between slide and print, while today monitor, digital proof and offset printing are important. Therefore, proofs must always be viewed under D50 Standardized Light, so that they are really “colour-binding” in their perception.

If you want to check metamerism effects, we recommend the UGRA colour temperature indicator. With these strips, metamerism effects can be checked very quickly and clearly.


What is the UGRA-Fogra Media Wedge 3.0 used for?

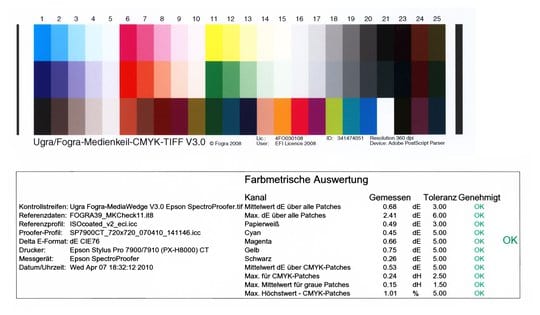
Ugra Fogra-MediaWedge V3.0 and measuring protocol

Every print shop in Germany adheres to a predefined standard, the process standard offset printing. This standard defines target and tolerance values for printed products. In order to prove that your proof delivered to the print shop meets these standards or is within the tolerances, the media wedge is measured and the values analysed in case of doubt – i.e. in case of a streak. If these measured values are correct, the print shop is obliged to adhere to and achieve these values.

Practice generally shows the following: If you want to have a 4-page image brochure proofed and printed, it is usually sufficient to have a single media wedge printed under the 4 pages. If the media wedge is also provided with a test report, the colour accuracy for the print shop is directly confirmed as a guideline.
However, if you want to be on the safe side, have a separate media wedge (including test report) printed under each of the 4 pages of your brochure.

How colour-accurate are proofs?

Ugra Fogra-MediaWedge V3.0 and measuring protocol

A proof is prepared according to the currently valid ISO standard 12647-7 and is legally binding with a UGRA-Fogra media wedge and measurement report.

How does this check work?

If you need a proof with UGRA/Fogra Media Wedge CMYK V3.0, there are two ways to add the test report to your data.

  1. With proofing devices in which a measuring device is integrated, the media wedge with 3×24 standardised colour fields is printed directly under the proof data. This media wedge is driven directly in the proofing device to a kind of “hair dryer” in the measuring device and dried there. After a few minutes of drying, the media wedge continues and is measured directly in the proofer. This takes a few minutes. The measured values determined in this way are returned to the proof server and evaluated there. If the colour values are correct and within the tolerances of the strict ISO standard, a test report of the measurement is then printed directly under the media wedge, which guarantees you colour accuracy in accordance with the process standard offset printing.
  2. For proofing devices without integrated measuring device, only the standardized media wedge is printed under the proof data. A check takes place subsequently and outside the proof printer. The media wedge is then measured with an external measuring device and the target and tolerance values are output to a label printer. This label is then stuck directly under the media wedge.

What is the advantage of automated creation and checking of the media wedge directly in the proofing device?

  • Measurement is automated directly after proof printing, measurement errors due to manual operating errors are excluded. Since the test report is not subsequently attached, as is often still the case, manipulation is impossible.

Further information on the test report, the media wedge and on the work and responsibility of UGRA/Fogra can be found at www.ugra.ch and www.fogra.org.

WordPress Cookie Plugin by Real Cookie Banner